.png)
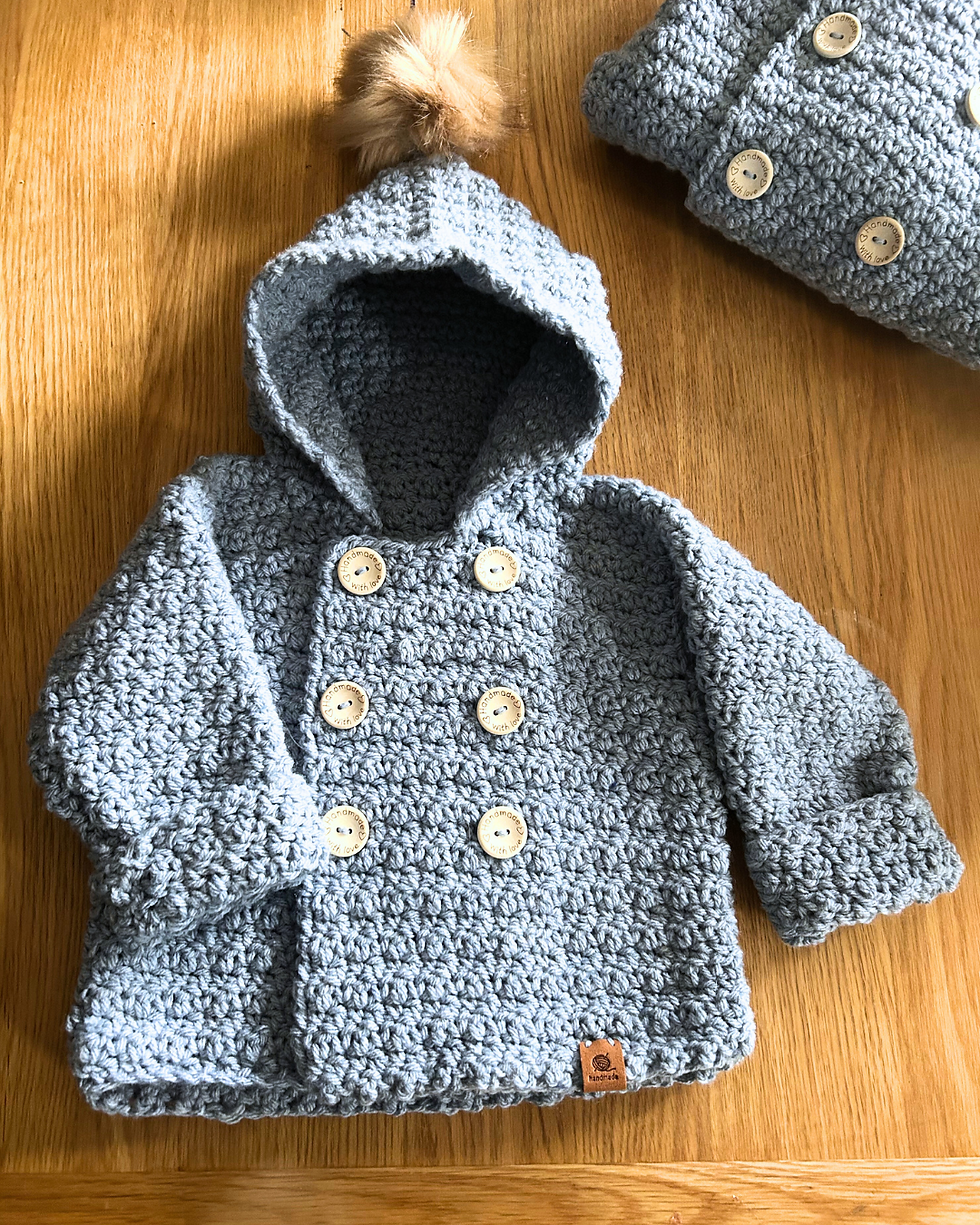
Cute & Cosy Chunky Cardigan: A Free Crochet Pattern to Enjoy!
- beccalking
- Mar 8
- 7 min read
Rainy spring days provide the perfect opportunity for crafting. What better way to use that mountain of craft supplies than by making gifts for others and getting a head start on the season?
I have two little nephews and wanted to make them something special that wouldn't take forever to complete, given my limited attention span and patience. That's when I stumbled upon a delightful pattern for some stunning cardigans. Naturally, I tweaked it to make it thicker, quicker to create, and available in multiple sizes so that my nephews could have matching ones - too cute!
The original pattern was from Yarnspirations, which used a lightweight yarn. However, I wanted to transform it into a cosy, chunky alternative that would be warm and snug for the Irish winter.
I've provided links to the materials I personally prefer and used to create these items. By clicking the links to make a purchase, you graciously support me with a small commission.

Cute & Cosy Chunky Cardigan Pattern:
You Will Need:
Stitch Markers
Materials:

I love Hayfield Bonus Chunky Yarn as it is soft and thick, and works up beautifully. Here is the approximate amount of yarn you will need for each size:
1-2 years – 4 balls
2-3 years – 5 balls
3-4 years – 6 balls
Abbreviations:
Approx: Approximate(ly)
Beg: Begin(ning)
Ch: Chain(s)
Cont: Continue(ity)
Dc: Double crochet
Hdc2tog: Yoh and draw up a loop in each of next 2 stitches. Yoh and draw through all loops on hook
Inc: Increase(ing)
Rep: Repeat
Rem: Remain(ing)
RS: Right side
Sc: Single crochet
Sl st: Slip stitch
Sp(s): Space(s)
St(s): Stitch(es)
Tog: Together
WS: Wrong side
Yoh: Yarn over hook
Instructions:
The instructions are provided for the smallest size. For larger sizes, any necessary adjustments will be indicated within parentheses ( ).
Back Panel:
Start: Ch 36 (38, 40).
Row 1: (RS). 1 sc in 2nd ch from hook. '1 dc in next ch. 1 sc in next ch. Rep from ' to end of chain. Turn. 35 (37, 39)
Row 2: Ch 3 (counts as dc). 1 sc in next dc. '1 dc in next sc. Rep from ' to end of row. Turn.
Row 3: Ch 1. 1 sc in first dc. '1 dc in next sc. 1 sc in next dc. Rep from ' to end of row. Turn. Rep last 2 rows for pattern until work from beginning measures 9” (10”, 11”) ending on a WS row.
Shape Armholes:
Next Row: (RS). Sl st across first 3 sts. Ch 1. 1 sc in same sp as last sl st. continue pattern to last 2 sts. Turn and Leave rem 2 sts unworked.
Continue even in pattern over the remaining 31 (33, 35) sts until armhole measures 5” (5.5”, 6”) ending on a WS row. Ch1 and Fasten off.
Front Right Panel:
Start: Ch 26 (28, 30)
Row 1: (RS). 1 sc in 2nd ch from hook. '1 dc in next ch. 1 sc in next ch. Rep from ' to end of chain. Turn. 25 (27, 29) sts.
Continue in pattern as given for back panel until work from beginning measures 9” (10”, 11”) ending on a WS row.
Shape Armhole:
Next Row: (RS). Continue in pattern to last 2 sts. Turn. Leave rem sts unworked.
Continue even in pattern over rem 23 (25, 27) sts until armhole measures 6 rows less than Back, ending on a WS row. Ch 1 and Fasten off.
Shape Neck:
Row 1: (RS). Skip first 9 (11, 12, 15) sts. Join yarn with sl st to next st. Ch 2 (does not count as st). Hdc2tog over same st as last sl st and next st. Continue pattern to end of row. Turn.
Row 2: Continue in pattern to last 2 sts. Hdc2tog. Turn.
Row 3: Ch 2 (does not count as st). Hdc2tog. Continue in pattern to end of row. Turn.
Rep last 2 rows once more, then 2nd row once. 8 (8, 9, 10) sts. Ch 1 and Fasten off.
Mark Out The Buttons:
Place markers for 6 buttons on Right Front in 3 rows (double breasted), spaced as follows:
Top row of 2 buttons positioned 2 rows down from neck edge – first button 1" [2.5 cm] from front edge; second button 4½" [11 cm] from front edge (3½" [9 cm] apart from each other).
Bottom row of 2 buttons positioned 18 (18, 20) rows down from neck edge – first button 1" [2.5 cm] from front edge; second button 4½" [11 cm] from front edge (3½" [9 cm] apart from each other).
Centre row of 2 buttons positioned evenly between top and bottom rows – first button 1" [2.5 cm] from front edge; second button 4½" [11 cm] from front edge (3½" [9 cm] apart from each other).
Left Front Panel:
Note: Work buttonhole row to correspond to markers on Right Front as follows:
Work the same pattern as given for Right Front Panel except, where there is a button placed, you will then make this into a button hole as below:
Buttonhole row: (RS). (Pattern to button marker. Ch 1. Skip next st) twice. Pattern to end of row.
Shape Armhole:
Next row: (RS). Sl st across first 2 sts. Ch 1. 1 sc in same sp as last sl st. Continue in pattern to end of row. Turn.
Continue even in pattern over remaining 23 (25, 27) sts until armhole measures 6 rows less than Back (working buttonhole row to correspond to markers on Right Front), ending on a WS row.
Shape Neck:
Row 1: (RS). Pat across 12 (12, 13) sts. Hdc2tog (neck edge). Turn. Leave remaining sts unworked.
Row 2: Ch 2 (does not count as st). Hdc2tog. Continue in pattern to end of row. Turn.
Row 3: Continue in pattern to last 2 sts. Hdc2tog. Turn.
Row 4: As 2nd row.
Row 5: As 3rd row
Row 6: As 2nd row. 8 (8, 9, 10) sts. Ch 1 and Fasten off.
Sleeves (Make 2):
Start: Ch 22 (24, 26)
Row 1: (RS). 1 sc in 2nd ch from hook. '1 dc in next ch. 1 sc in next ch. Rep from ' to end of chain. Turn. 21 (23, 25) sts.
Continue in pattern as given for Back for 3 (5, 7) more rows.
Shape Sides:
Row 1: (Inc row). Ch 3 (counts as dc). 1 sc in first dc. '1 dc in next sc. 1 sc in next dc. Rep from ' to last 2 sts. 1 dc in next sc. (1 sc. 1 dc) in last dc. Turn.
Row 2: Ch 1. 1 sc in first dc. 1 dc in next sc. 1 sc in next dc. Rep from to end of row. Turn.
Row 3: Ch 3 (counts as dc). '1 sc in next dc. 1 dc in next sc. Rep from ' to end of row. Turn.
Rep last 3 rows 3 times more. 29 (31, 33) sts.
Continue even in pattern until work from beginning measures 10” (11.5”, 13”), ending on a WS row. Place markers at each end of the last row.
Work another 2 rows even in pattern. Ch1 and fasten off.
Assembly:
Lay all panels out flat and sew together as follows:
Sew the shoulder seams. Attach the sleeves by aligning the rows above the markers with the unworked stitches of the Body to create square armholes.
Sew the side and sleeve seams, and reverse the seam for the last 2 inches (5 cm) of the sleeve cuff to allow for turnback.
Sew on buttons if you haven’t done this already.
Hood:
Place markers on neck edge 3½" [9 cm] in from front edge.
With RS facing, join yarn with sl st at the right front neck marker. Ch1. Work 47 (47, 51) sts evenly around the neck edge to the opposite marker. Turn.
Next Row: Ch 1. 1 sc in first sc. '1 dc in next sc. 1 sc in next sc. Rep from ' to end of row. Turn. Place marker on centre back st.
Next Row: (RS). Ch 3 (counts as dc). (1 sc in next dc.1 dc in next sc) 11 (11, 12) times. (1 sc. 1 dc. 1 sc) all in next dc (centre back st). (1 dc in next sc.1 sc in next dc) 11 (11, 12) times. 1 dc in last sc. Turn. Work 3 rows even in pattern.
Next Row: (RS). Ch 3 (counts as dc). (1 sc in next dc. 1 dc in next sc) 11 (11, 12) times. 1 sc in next dc. (1 dc. 1 sc. 1 dc) all in next sc (centre back st). (1 sc in next dc.1 dc in next sc) 12 (12, 13) times. Turn. Work 3 rows even in pattern.
Next Row: (RS). Ch 3 (counts as dc). (1 sc in next dc. 1 dc in next sc) 12 (12, 13) times. (1 sc. 1 dc. 1 sc) all in next dc (centre back st). (1 dc in next sc. 1 sc in next dc) 12 (12, 13) times. 1 dc in last sc. Turn. 53 (53, 57) sts.
Continue even in pattern until Hood measures 9.5” (10”, 10.5”) from neck edge, ending on a WS row. Ch 1 and Fasten off.
Fold Hood in half and sew top Hood seam.
To Make a PomPom: Wind yarn around 4 fingers approximately 100 times. Remove from fingers and tie tightly in the centre. Cut through each side of loops. Trim to a smooth round shape. Sew to end of Hood. Alternatively, you can purchase some beautiful faux fur pompoms for an elevated finish. I have linked the ones that I use here.
Your creation is now complete!
Crocheting can be an incredibly relaxing and therapeutic activity. The repetitive motion of creating stitches can help to calm the mind, reduce stress, and provide a sense of accomplishment. As you work through this pattern, take a moment to appreciate the meditative nature of crochet. Enjoy the process, and remember that every stitch is a step towards creating something beautiful and unique.
Happy crocheting!


Comments